The purpose of this article is to explain how to install NVM, or Node Version Manager, on Windows, Linux, and Mac.
What is NVM?
The Node Version Manager (NVM) is a tool for managing Node versions on your device.
There may be different versions of Node installed on your device. Using only one version (the one installed by npm) may not give you an accurate execution.
If you use a Node version of 10.0.0 for a project that uses 12.0.0, you may get some errors. Or if you update Node to 12.0.0 with npm and use it for a project that uses 10.0.0, you may not get the expected results.
Most likely, you would get a warning that says:
This project requires Node version X
Nvm helps you manage your Node versions effectively for each project, rather than using npm to install and uninstall Node versions.
With NVM, you can install different versions of Node and switch between them depending on the project you’re working on.
You will learn how to install NVM on Windows, Linux, and Mac in the following sections.
To avoid conflicts between Node.js and NVM, I also recommend uninstalling Node.js if you already have it installed.
How to Install NVM on Windows
NVM is mostly supported on Linux and Mac. It does not support Windows. However, coreybutler has created nvm-windows which provides an NVM experience in Windows.
Here’s how to install nvm-windows for managing Node.js versions on Windows:
1. To download, click the “Download Now” button.
Click on “Download Now!” in the nvm-windows repository Readme:
A page showing different NVM releases will appear.
2. The latest release’s .exe file should be installed
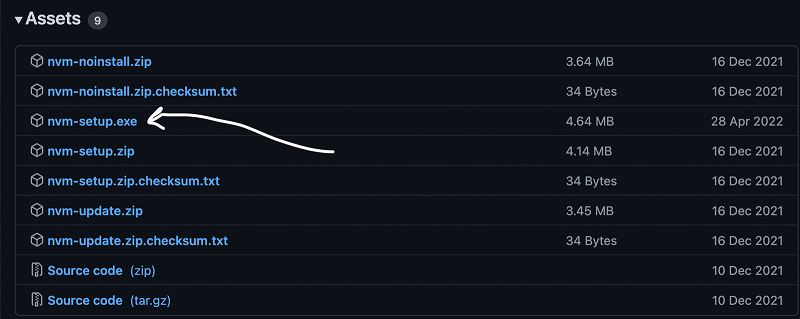
In the latest release (at the time of writing, 1.1.9), you’ll find different assets. Click on the nvm-setup.exe asset, which is the installation file.
3. The Installation Wizard must be completed
Complete the installation wizard after you have downloaded the file.
After installing NVVM, you can verify that it has been installed by running:
nvm -vIn the case that nvm was installed correctly, this command will show you the version of nvm that is installed.
How to Install NVM on Linux and Mac
You can install NVM on both Linux and Mac since they are both UNIX-based OSes.
Install NVM
Run the nvm installer in your terminal as follows:
curl -o- https://raw.githubusercontent.com/nvm-sh/nvm/v0.39.1/install.sh | bash

# or

wget -qO- https://raw.githubusercontent.com/nvm-sh/nvm/v0.39.1/install.sh | bash
Depending on the command available on your device, you can use curl or bash.
Cloning nvm will create a ~/.nvm directory on your device.
Configure your profile
In addition to setting up the NVVM configuration, the installation process should also add it to your profile. If you’re running zsh, it would be in your .zshrc file, if you’re running bash, it would be in your .bash_profile.
You can manually add NVM configuration to your profile file if it does not automatically do so:
export NVM_DIR="$([ -z "${XDG_CONFIG_HOME-}" ] && printf %s "${HOME}/.nvm" || printf %s "${XDG_CONFIG_HOME}/nvm")"
[ -s "$NVM_DIR/nvm.sh" ] && \. "$NVM_DIR/nvm.sh"
NVM is loaded for use with this command.
Reload the shell configuration
Now that you have updated your profile configuration, you can reload the configuration for your terminal:
source ~/.bashrcWhen you run this command, nvm will be ready for use. To ensure nvm is installed correctly, run the following command:
nvm -vThe version of NVM installed should be displayed here.
Final thoughts
NVVM allows you to install, uninstall, and switch between different Node versions on Windows, Linux, and Mac.
Node versions can be installed as follows:
nvm install latestThe following command will install the latest version of Node:
nvm install vX.Y.ZThe X.Y.Z Node version will be installed.
Alternatively, you can make a version your default by running:
nvm alias default vX.Y.ZYou can also run the following in your terminal if you want to use a specific version:
nvm use vA.B.CUsing NVM, you can manage multiple versions of Node.js across different projects.


Leave a comment